Bearing identification guide · reviewed 2026-08-20
How to measure a bearing: bore, outside diameter and width
Start with the marking, not the calipers. Photograph every character first, then measure d, D and B to identify the likely basic designation without losing the suffixes that complete the specification.
Before measuring: preserve the evidence
Photograph both faces and the edge before wiping the bearing. Copy every character, space, slash and suffix exactly as it appears; do not silently turn one maker's seal code into another. Note the bearing's position and orientation, plus any separate snap ring, flange, sleeve, spacer or locknut.
Wipe away only the loose oil or dirt needed to reveal the marking. Do not abrade the ring or remove a shield or seal merely to identify it. The basic number usually gets you to a size and family. The suffixes may carry the information that decides whether the replacement is actually suitable.
Measure d: the bore
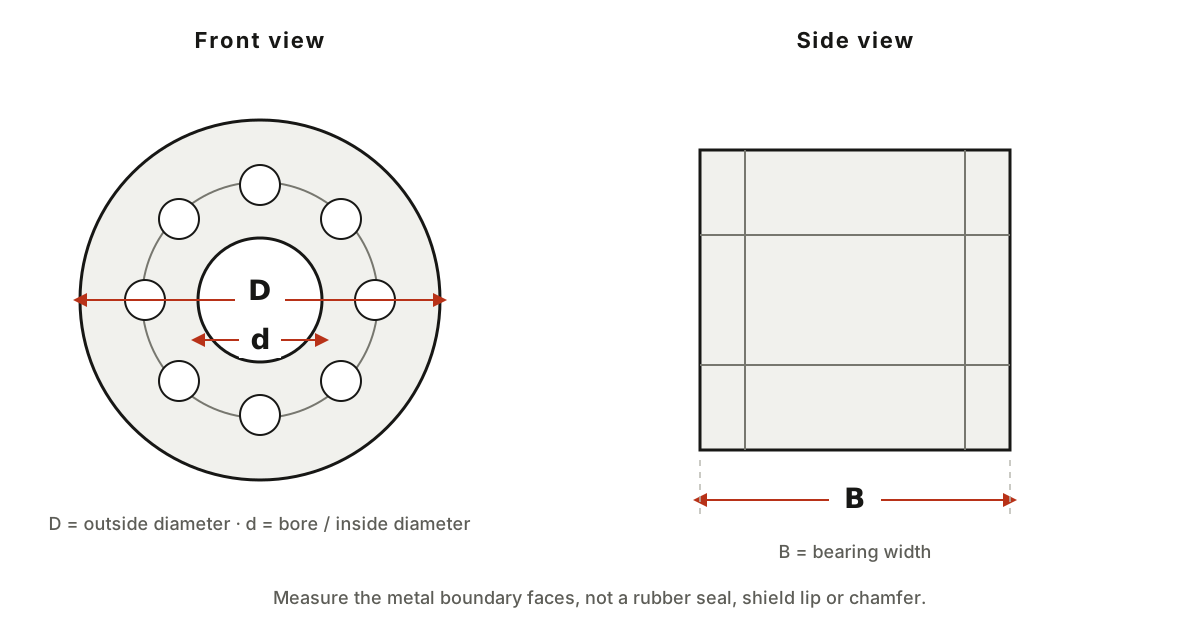
Use the inside jaws of a clean vernier or digital caliper across the inner-ring bore. Keep the caliper square to the bearing axis and use light contact rather than forcing the jaws apart. Repeat the measurement at two or more angles and record the readings before rounding anything.
The lowercase d is the bearing bore. A shaft measurement can support the identification, but it does not replace measuring the bearing because shaft fits and tolerances are separate from the bearing's nominal boundary dimensions.
Measure D: the outside diameter
Use the outside jaws on the outer ring and keep them square. Avoid raised dirt, burrs and any separate snap ring. Repeat around the circumference. A large spread between readings is a warning about damage or technique, not a reason to average the values into the nearest catalogue size.
Measure B: the width
Measure between the two flat ring faces, square across the bearing. For the deep groove bearings in this reference, B is the total bearing width. Tapered, thrust, flanged, insert and multi-row designs can use additional dimensions and should be identified from the drawing for that bearing type.
If the bearing is dirty, corroded or worn
Boundary dimensions do not normally disappear through ordinary raceway wear, but rust scale, burrs, impact damage and distorted rings can corrupt a hand measurement. Do not file or sand a surface until it produces a neat number.
Measure several positions and record the spread. Enter the cleanest credible reading as approximate. If the ring is broken or distorted, measure the mating shaft and housing only as supporting evidence and send the marking, photographs and readings with the enquiry.
Can dimensions identify the complete bearing?
Dimensions can identify a likely basic designation, but not the complete specification. For example, 17 × 40 × 12 mm matches the basic designation 6203 in this sourced reference. That does not tell you whether the original was open, shielded or sealed, or whether it used CN, C3 or another internal-clearance class.
If a measurement sits between catalogue sizes, clean and re-square the caliper and repeat it. Do not choose the nearest bearing blindly. Use the full marking, closure arrangement, clearance, snap-ring groove or flange, manufacturer reference, photographs and machine location to confirm the replacement.
Sources
Reviewed against primary standards and manufacturer material on 20 August 2026. Links identify what each statement rests on; they do not replace the current product datasheet.
- ISO 15:2017 — radial-bearing boundary dimensionsStandards scope and current-status record.
- NTN — Boundary Dimensions and Bearing Number CodesManufacturer explanation of boundary-dimension symbols and bearing-number codes.
- NSK — MountingManufacturer diagrams and mounting terminology.
- NSK — Bearing Designation SystemsWhy the complete manufacturer designation matters.